






Bots target WooCommerce stores in a few predictable places: the checkout, where they test stolen card numbers, and the login and registration forms, where they guess passwords and create fake accounts. Adding Google reCAPTCHA to those forms puts an “I’m not a robot” check in front of each one.
This guide shows you how to set it up with our free plugin, reCAPTCHA for WooCommerce, which is used on over 40,000 sites. It works with both the classic checkout and the newer Checkout block, and setup takes about ten minutes.
What you need
- A Google account, to create your reCAPTCHA keys.
- Admin access to your WordPress site, so you can install a plugin. WooCommerce is only needed for the WooCommerce forms; the WordPress login, registration and password reset forms work without it.
The plugin is free and has no paid version. Google now runs reCAPTCHA through Google Cloud, where it’s free for up to 10,000 assessments a month, shared across all the sites on your Google Cloud organisation. Each checked form submission counts as one, so most small and medium stores stay within the free allowance, but a busy store should check its usage.
Step 1: Create your reCAPTCHA v2 keys
- Go to the reCAPTCHA admin console and sign in with your Google account. Google may ask you to pick or create a Google Cloud project for the keys.
- Give the site a label you’ll recognise, such as your shop name.
- For the reCAPTCHA type, choose Challenge (v2) and then “I’m not a robot” tickbox.
- Add your domain without
https://or a trailing slash, for exampleexample.com. Subdomains are covered automatically, but a separate staging domain needs adding too. - Accept the terms and submit.
Google then shows you a site key and a secret key. Keep the page open for step 3.
Make sure you pick v2. The plugin only works with v2 “I’m not a robot” keys, and v3 or invisible keys will fail. If you’ve already made a v3 key by mistake, create a new v2 key rather than trying to change the existing one.
Step 2: Install the plugin
In your WordPress admin, go to Plugins › Add New Plugin, search for “reCAPTCHA for WooCommerce”, then click Install Now and Activate. You can also download it from WordPress.org.
WordPress takes you to the settings page when you first activate it. After that, you’ll find it under Settings › reCAPTCHA WooCommerce.
Step 3: Add your keys
Under API Key Settings, paste the site key into Site Key / ID and the secret key into Secret Key, then click Save Changes. Take care not to swap them: the site key is public, and the secret key should never be shared.
Nothing appears on your forms until both keys are saved. If you’d rather keep them out of the database, you can define them in wp-config.php instead.
Step 4: Run the API test
Once your keys are saved, a test box appears at the top of the settings page. Tick the reCAPTCHA checkbox, complete any image challenge, and click TEST RESPONSE. A green “Success!” message means your keys match and your server can reach Google.
The test is required before reCAPTCHA is added to the WordPress login form. That stops you locking yourself out of your own site with a wrong key. If the test fails, see fix a failing Test API Response.
Step 5: Choose which forms to protect
Tick the forms you want under WordPress Forms and WooCommerce Forms, then save:
- WordPress: login, registration and password reset. The password reset option covers the WooCommerce “lost password” form as well.
- WooCommerce: My Account login and registration, the checkout, and the pay for order page.
If a customer creates an account while checking out, they only complete one check, not two.
The checkout has a few extra options:
- Guest Checkout Only: only show reCAPTCHA to customers who aren’t logged in, so returning customers aren’t slowed down.
- Widget Location on Checkout: before or after the payment methods, before or after the billing details, or just before the Place Order button.
- Payment Methods to Skip: turn the check off for chosen payment gateways. On the Checkout block, Apple Pay, Google Pay and Link through WooPayments or Stripe are skipped automatically, because express payments complete in a payment sheet where a reCAPTCHA can’t be shown. Other express buttons, such as PayPal’s, may need adding here. See express checkout compatibility.
Step 6: Check your checkout
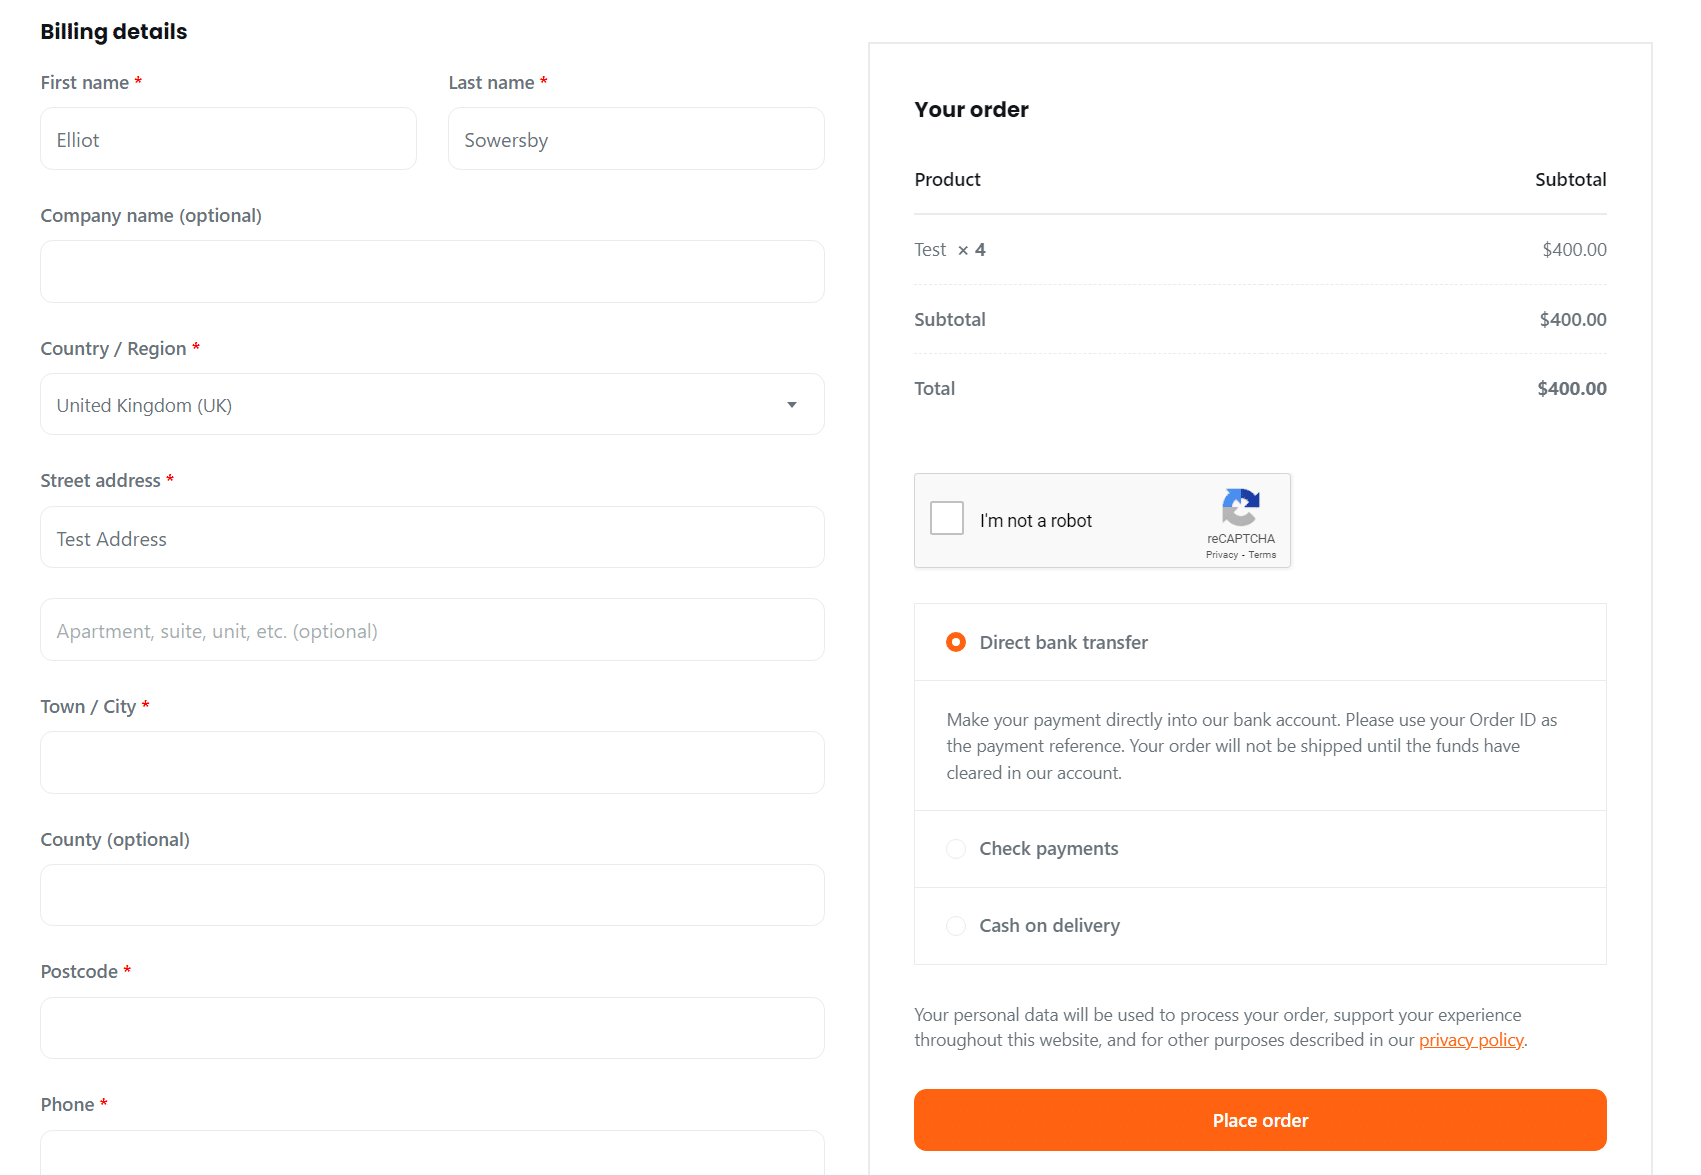
Add a product to the cart in a private browser window and go to the checkout. You should see the “I’m not a robot” box in the position you chose. Use a private window because, as a logged-in admin, you won’t see it if Guest Checkout Only or the logged-in whitelist is turned on.
Other settings
- Theme: light or dark, to match your forms. The language follows your site’s language automatically.
- Whitelist: skip the check for logged-in users, specific IP addresses, or user agents such as an uptime monitor.
- Custom error message: change the message customers see if the check fails.
- Load scripts on all pages: only needed if one of your protected forms is on a page other than the login screen, My Account or Checkout.
If the reCAPTCHA box doesn’t appear
- Check both keys are saved. If either is missing, the plugin shows nothing and doesn’t report an error.
- Check you’re not exempt. Guest Checkout Only, the logged-in whitelist and the IP whitelist all hide the box on purpose. Test in a private window.
- Check the domain. If you see an error inside the box instead of a checkbox, the key isn’t registered for this domain. Add it in the reCAPTCHA admin console.
- Check for script conflicts. A caching or optimisation plugin that delays JavaScript, or a second CAPTCHA plugin on the same form, can stop the box loading.
The reCAPTCHA box is not showing guide covers these in more detail, including the Checkout block. If customers see “Please complete the reCAPTCHA” even after ticking the box, see this guide to that error.
What this plugin doesn’t cover
reCAPTCHA for WooCommerce is built for the store forms above. It doesn’t add reCAPTCHA to the WordPress comment form, product reviews, or contact form plugins such as Contact Form 7 and Gravity Forms, which usually have their own reCAPTCHA settings.
If you’d prefer one plugin for all your forms, or a check that doesn’t make customers click through image puzzles, our free Cloudflare Turnstile plugin is the alternative. It supports comments, 20+ form and membership plugins, and the WooCommerce forms covered here. Our guide to stopping WooCommerce spam orders and card testing compares the two and covers the other steps worth taking, such as your payment gateway’s fraud rules.
Getting started
Install reCAPTCHA for WooCommerce from WordPress.org, create your v2 keys, and your checkout and login forms can be protected in about ten minutes. Every setting is covered in the documentation, and you can ask for help in the WordPress.org support forum.

Our plugins
Grow your WooCommerce store
Affiliates, loyalty points, store credit, tax exemption and more – trusted on 248,000+ sites.


Comments