





Set up Turnstile on your site
Updated September 13, 2026
Setup is four steps: create a Turnstile widget in Cloudflare, paste the two keys into Settings › Cloudflare Turnstile, tick the forms you want protected, and run the API test. Turnstile will not be added to any form until that test passes.
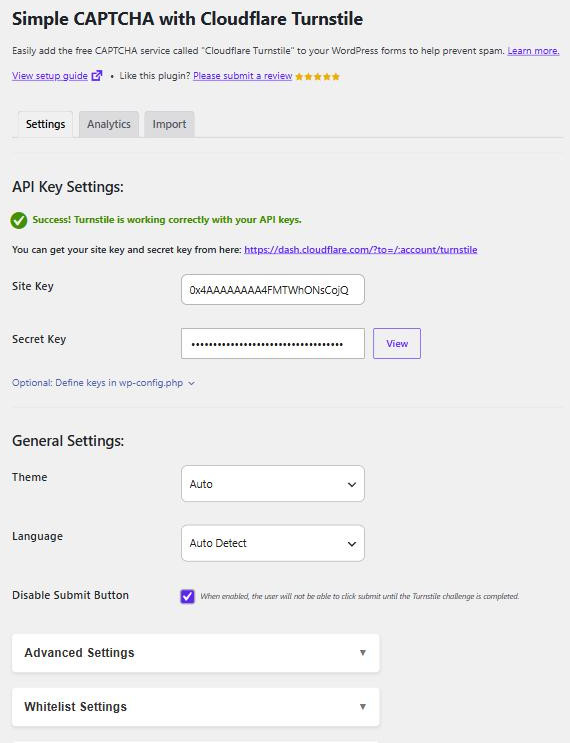
Generate a site key and secret key
Sign in to the Turnstile section of the Cloudflare dashboard and add a new widget. You will be asked for:
- Hostnames — the domain your forms live on. Add every domain that will show the widget, including any staging or
wwwvariant you use. A hostname mismatch is the usual reason a widget renders but fails on submit. - Widget mode — Managed is the right choice for almost every site.
Cloudflare then gives you a Site Key (public, appears in your page source) and a Secret Key (private, used only server-side).
Enter the keys
Paste both into Site Key and Secret Key under API Key Settings, then click Save Changes. The secret is masked; the View button next to it reveals what is stored if you need to check it.
If you would rather not store the keys in the database at all, you can define them as constants instead — see Define your API keys in wp-config.php.
Choose your forms
Scroll to Enable Turnstile on your forms and open the panel for each area you want covered — Default WordPress Forms for login, registration, password reset and comments, plus a panel for every supported plugin that is active on the site. Tick the forms you want, then save again.
Test the API response
Finally, click TEST RESPONSE. This completes a real challenge and sends the resulting token to Cloudflare using your secret key, which is the only way to confirm both keys work together. Until it succeeds, Turnstile stays off your forms and WordPress shows an admin notice saying so.
If the test fails, the error message names the cause. See Test the API response.