






WooCommerce doesn’t have a loyalty program built in. To create one, you add a points and rewards plugin: customers earn reward points when they shop, and they swap those points for a discount on a later order. In short, you install the plugin, set how many points each dollar earns, set what a point is worth, create the rewards and show the program at checkout. The setup takes about half an hour. Most of that time goes on deciding how much each point is worth, because the cost of the program depends on it.
This guide starts with that sum, then goes through the setup step by step using the free version of Simple Points and Rewards. We make that plugin, so we’re not neutral. Every step below works on the free version, and we say clearly where a setting needs PRO. If you’d rather compare other plugins first, there’s a section on alternatives near the end.
In this guide
- Before you start: work out what a point is worth
- How to create a loyalty program in WooCommerce
- Give your best customers more with levels
- Keep track of what the program costs
- Moving from another loyalty plugin
- What the free version leaves out, and other plugins
- FAQ
Before you start: work out what a point is worth
A points program has two rates. The earning rate says how many points a customer gets for each dollar they spend. The redemption rate says how many points they need for a dollar off. Divide the first by the second and you get your reward rate: the share of each order you give back.
Simple Points and Rewards starts with 5 points per $1 spent and 100 points per $1 of discount. 5 divided by 100 is 5%, so out of the box a customer gets back 5 cents for every dollar they spend.
That can be more than a small store can afford. Say your average order is $60 and your margin on it is 40%, so you make $24. At 5%, every order adds $3 of future discount, an eighth of your profit. At 2% it adds $1.20, a twentieth. Plan as if every point will be spent. Some never will be, but you can’t count on that.
For a benchmark, the loyalty platform Nector suggests that 1% to 3% is sustainable for most direct-to-consumer brands, and that above 5% a program starts to look more like a discount than a reward.
We’d keep the redemption rate at 100 points per $1, because round numbers are easy for customers to understand, and change only the earning rate. Then check how long it takes to reach the first reward. At 3 points per $1, a customer who spends $60 a time has 540 points after three orders, enough for a $5 voucher at 500 points. Aim for a first reward within three or four orders of an average size.
A points program also needs customers who come back. If you sell something people buy once, like a mattress or a wedding dress, points they can only spend with you won’t change much. A refer-a-friend program usually fits those stores better.
How to create a loyalty program in WooCommerce
Before you start: you need a working WooCommerce store, and customers need accounts to collect points (guest points tracking is a PRO feature). These steps were checked against Simple Points and Rewards 2.3.0. The example values on our test store use US dollars.
Step 1: Install the plugin
Install Simple Points and Rewards from WordPress.org and activate it. A new Points & Rewards menu appears in your dashboard. Open Points & Rewards › Settings and check that Enable Rewards Program at the top is switched on.
A fresh install comes with default rates and three example rewards. The steps below change those defaults to fit your numbers.
Step 2: Set the earning rate
Go to the Ways to Earn tab and click Edit on Points for Spending. Under Points earning rate, enter the number of points and the amount spent that earns them. For a 3% reward rate with the default redemption rate, that’s 3 points per 1.
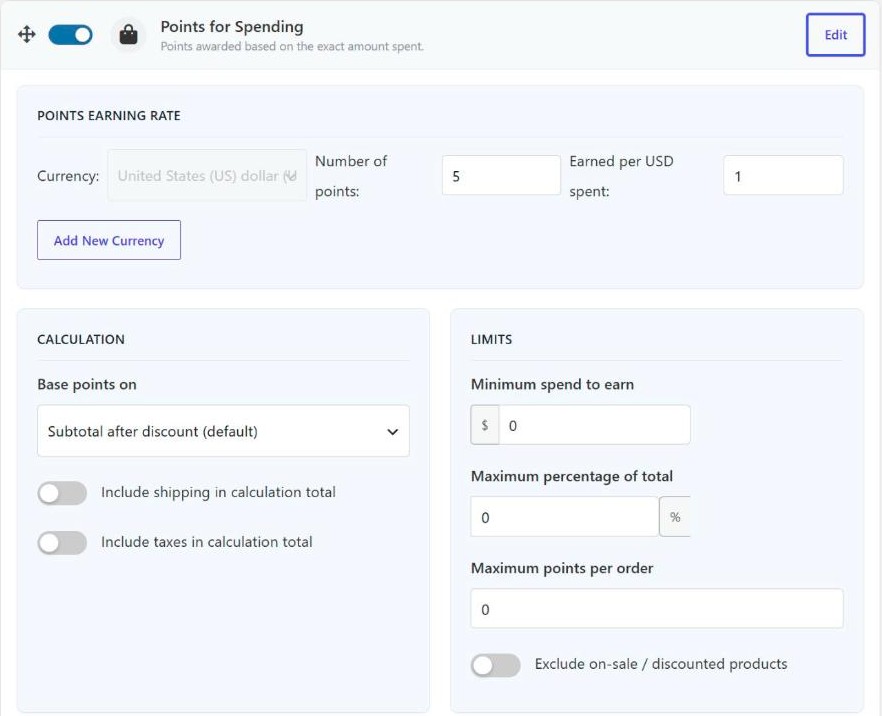
The Calculation box controls which part of the order earns points. Base points on defaults to Subtotal after discount, so coupon savings don’t earn points. Shipping and tax are left out unless you switch them on. We’d leave all three as they are, because you don’t keep the tax and shipping is rarely profit.
The Limits box has four optional settings, all in the free version:
- Minimum spend to earn: orders below this amount earn nothing.
- Maximum percentage of total: caps the value of the spending points on one order at a percentage of the order total, worked out with your redemption rate. If you set it to your target reward rate, a level multiplier can’t push an order’s spending points past it. Fixed points and bonuses aren’t counted in this cap.
- Maximum points per order: a hard cap in points, useful if you take very large orders.
- Exclude on-sale / discounted products: sale items earn no points, which stops a sale price and points stacking on the same product.
If you’d rather give a fixed number of points when an order reaches a threshold, for example 100 points on any order over $50, use Points for Orders on the same tab. It’s off by default and also free.
Step 3: Choose when points are awarded
Further down the Points for Spending panel, Award points has two options. When order is placed is the default, so customers see their points straight away. When order is completed waits until the order reaches the status set in Completed status. If you get a lot of returns, completed is the safer choice.
Leave Deduct points when order is refunded or cancelled switched on. It’s on by default and takes the points back when an order is refunded or cancelled. PRO adds a Points Delay setting that holds points back for a set time before they reach the customer’s balance, which covers a returns window without waiting for completion.
One more option here: Do not award ANY points on orders where points were redeemed at checkout. It’s off by default. Turn it on if you don’t want an order paid partly with points to earn new ones.
Step 4: Add sign-up and referral points (optional)
Two more ways to earn are free. Signup Bonus gives points when someone creates an account. It’s off by default and set to 100 points when you turn it on. A small sign-up bonus gives a guest at checkout one more reason to make an account.
The Referral System is on by default. Each customer gets a referral link, and they earn points when a friend they referred places an order. By default the bonus is given when that order is completed. The default is 100 points per referral, which is only $1 at the default redemption rate. If referrals matter to you, raise it to something a customer will notice, such as 500 points.
Then switch on Only award referral points for new customers. The plugin’s own help text recommends it. Without it, the referrer earns again on every repeat order the friend places. Block users from using their own referral link is already on. You can also set Maximum referral bonuses per referrer per day, and block referral points when the order comes from the same IP address as the referrer.
Step 5: Set up the rewards
Customers can spend points in two ways, and you can offer both. The first is reward vouchers. On the Rewards tab, each reward has a Reward Type, a Points Required cost and, for vouchers, a Voucher Amount and Discount Type. When a customer claims one, the plugin creates a WooCommerce coupon for them.
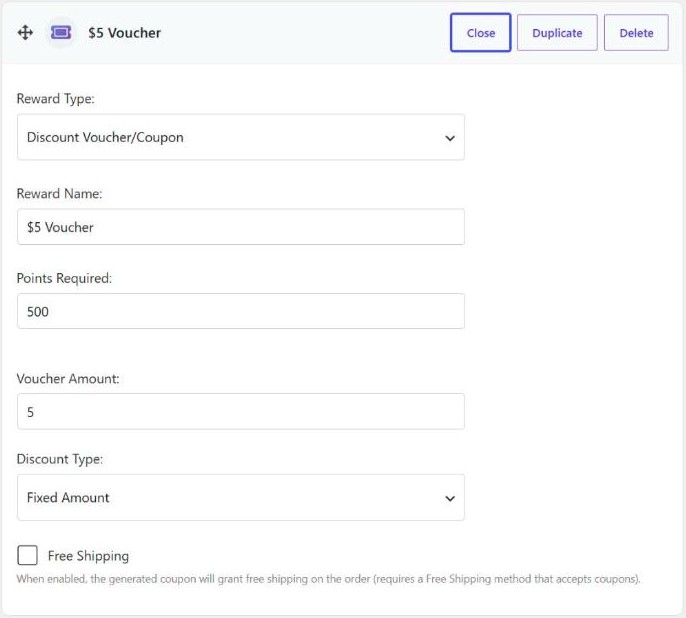
The free version supports Discount Voucher/Coupon and Free Product rewards, and a voucher can also give free shipping. It allows three rewards in total, and a new install fills all three with examples: a $5 voucher for 500 points, a $10 voucher for 900 points and a free product for 1,500 points. Edit those rather than adding new ones.
Price your vouchers with the same rate as the rest of the program. At 100 points per $1, a $5 voucher costs 500 points. The example $10 voucher at 900 points is a little cheaper per point, which gives customers a reason to save up. If you do that, count the larger voucher’s value when you work out your reward rate.
The second way is Points Discount on Checkout, further down the same tab and on by default. Customers choose how many points to use and get an instant discount on the cart or checkout page, with no coupon involved. The Points Redemption Rate sets the value, 100 points for 1.00 by default.
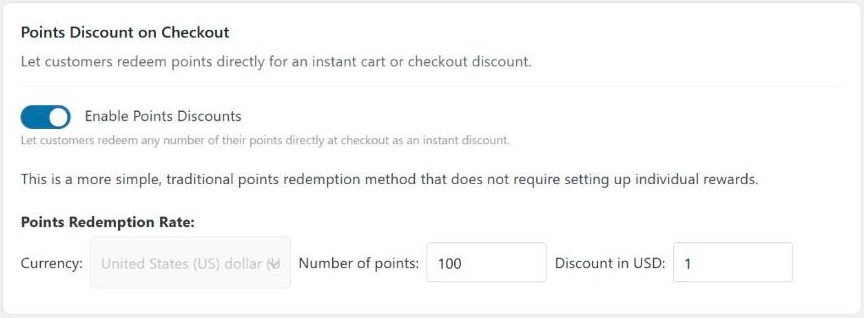
Limits on redemption, such as a minimum cart total or the most of a cart that points can pay for, are PRO settings. In the free version a customer with enough points can use them against the whole cart, so keep that in mind if you set a generous earning rate.
If you also run our Simple Store Credit plugin, points can turn into store credit instead of a coupon. Our guide to store credit, gift cards and coupons covers when that’s the better choice.
Step 6: Make sure customers can see the program
A loyalty program only changes what people do if they know about it. The plugin shows it in three places by default:
- A Rewards tab under My Account, with the customer’s balance, ways to earn, rewards to claim and points history. To show it on another page as well, use the
[spar_points_rewards]shortcode. - Product pages, with a line telling shoppers how many points the product earns. The setting is Show points on product pages on the Product Pages tab.
- A rewards box on the cart, checkout and thank you pages, telling customers how many points the order will earn and letting them claim rewards. Each page can be switched on or off in the Checkout Box tab.
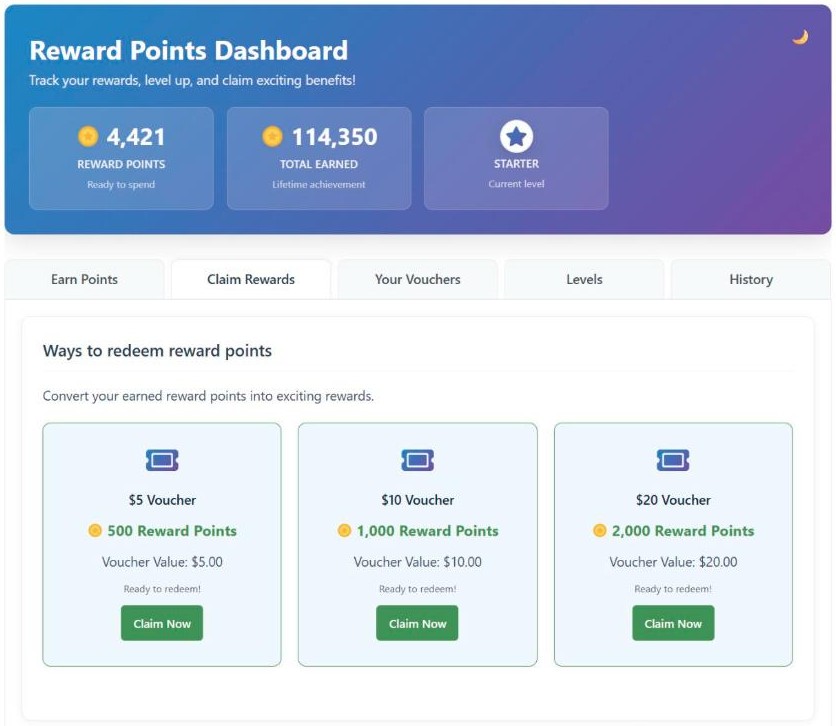
The Checkout Box tab also has Show rewards box for guest users. Turn it on and allow account creation at checkout under WooCommerce › Settings › Accounts & Privacy. A guest who can see the points an order would earn has a reason to create an account.
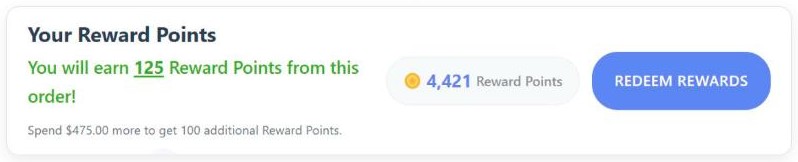
Then tell your existing customers, for example with an email to past buyers and a line on the shop page. The plugin’s own emails, under the Email Notifications tab, let customers know when they earn points and when they claim a reward.
Step 7: Test it with a real order
Log in as a test customer and place an order. If you chose to award points on completion, move the order to that status. Check the points appear in the customer’s Rewards tab. If they don’t, open the order in the admin: the Reward Points panel on the order screen says why an order hasn’t earned, for example because it has no customer account or hasn’t reached the right status yet.
Then claim a reward with the test account and use it on a second order, and refund the first order to check the points come back off. That covers everything a customer will do with the program.
Give your best customers more with levels
Levels let customers move up a tier as they collect points, and each level can earn points faster through a Points Multiplier. Turn it on with Enable Levels & Badges System on the Levels & Badges tab. The free version gives you the starting level plus one custom level, and PRO allows as many as you need.
A multiplier raises your reward rate for those customers. At 3 points per $1, a 1.5 multiplier means a top-level customer gets 4.5% back. Spending extra margin on your most regular customers can make sense, but do the sum before you choose the multiplier.
Keep track of what the program costs
Every unspent point is a discount you’ve promised. Points & Rewards › Reports & Analytics is free and shows two figures to watch. Points Liability is the money value of all the points customers currently hold, converted at your redemption rate. Redemption Rate is the share of earned points that have been spent in the date range you pick. Don’t confuse it with the Points Redemption Rate setting from step 5, which is the value of a point.
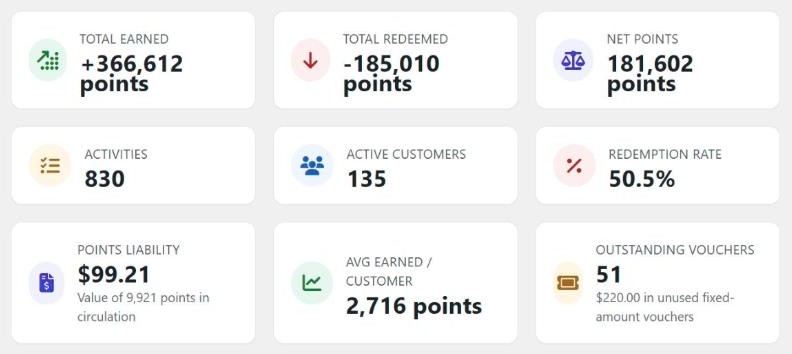
A low redemption rate means customers are collecting points but not coming back to spend them. Make the first reward easier to reach, or remind people of their balance. A liability figure that keeps rising means the balances are building up. PRO can reset points after a period of inactivity and send a reminder email first, which limits how much you owe and gives customers a reason to return.
Moving from another loyalty plugin
If you already run a points program, you don’t need to reset your customers’ balances. Simple Points and Rewards can import points data from WooCommerce Points and Rewards, MyRewards, WPLoyalty, Points and Rewards for WooCommerce by WP Swings, and YITH WooCommerce Points and Rewards. The migration guide covers the steps. Run the import on a staging copy of your store first and compare a few customer balances before you switch the live store over.
What the free version leaves out, and other plugins
The free version runs a complete program: points for spending, sign-ups and referrals, vouchers, free products, a checkout discount and reports. These need PRO:
- Points for reviews, birthdays, daily logins, social shares, a first order and every Nth order, plus order streaks and a prize wheel.
- Points expiry, points delay and guest points tracking.
- Limits on redemption and conditional rules for who earns what.
- More than three rewards, more than one custom level, and the floating rewards widget.
Simple Points and Rewards is also a young plugin. It was released in November 2025 and has fewer reviews than older options. If you’d like to see the alternatives, such as WPLoyalty, YITH WooCommerce Points and Rewards or the official WooCommerce extension, nine of them are compared in this roundup of the best points and rewards plugins for WooCommerce. The setup decisions in this guide apply to any of them, because they all come down to an earning rate and a redemption rate.
FAQ
Does WooCommerce have a loyalty program built in?
No. WooCommerce has coupons, but nothing that tracks points or rewards repeat customers. You need a plugin for that.
How much should a loyalty point be worth?
Work backwards from the share of each order you can afford to give back. Divide your earning rate by your redemption rate to get that share. For most stores 1% to 3% is a sensible range, and 5% is the top end.
Can guest customers earn points?
Not in the free version, because points are stored against a customer account. PRO can track points on guest orders and add them to the customer’s balance if they register later.
What happens to points when an order is refunded?
With the default settings, the points earned on that order are taken back when it’s refunded or cancelled. If you award points only on completion, an order cancelled before then never earns any.
Do loyalty points expire?
Only if you set them to. In Simple Points and Rewards, expiry is a PRO setting that resets a customer’s points after a period without activity, with an optional reminder email beforehand.
Should I use points or cashback?
Cashback is easier to explain because the reward is already in money. Points give you more ways to reward customers, such as sign-ups, referrals and levels. Our guide to offering cashback in WooCommerce covers the other option, and the two can run together.
Summary
Start from the reward rate your margin can carry and set the earning rate and reward prices from it. Once a test order works, check the Reports page every few weeks to see whether customers come back to spend their points. Simple Points and Rewards is free on WordPress.org, and the full list of settings is in the plugin documentation.

Our plugins
Grow your WooCommerce store
Affiliates, loyalty points, store credit, tax exemption and more – trusted on 248,000+ sites.

Comments